Machine Embroidery Density, Stitch Count, and Size: A Comprehensive Guide
Learn about machine embroidery density, stitch count, and size to ensure perfect consistency and quality in your embroidery projects. Find tips for selecting fabrics, stabilizers, and achieving the best results.
Embroidery is an art form that blends creativity with precision. Understanding the intricacies of machine embroidery density, stitch count, and size is crucial for producing high-quality designs. These elements dictate the fabric choice, stabilizer needs, and overall durability and appearance of the final product.
Understanding Machine Embroidery Density
What is Embroidery Density?
Embroidery density refers to the number of stitches in a specific area of your design. High-density areas have more stitches, making them thicker, while low-density areas have fewer stitches, resulting in a lighter look.
Importance of Consistency in Embroidery Patterns
Consistency is vital for the overall look and durability of the embroidery. Consistency involves maintaining uniform stitch density across the design to avoid areas that are too stiff or too loose. This balance helps in achieving a professional finish.
Factors Affecting Embroidery Density
Several factors influence embroidery density, including:
- Fabric Type: Different fabrics handle density differently. Heavier fabrics can support denser stitching.
- Design Complexity: Intricate designs often require varying densities.
- Thread Type: Thicker threads increase density.
Stitch Count in Machine Embroidery
Defining Stitch Count
Stitch count is the total number of stitches in a design. It helps in estimating the time required for completion and the amount of thread needed.
Calculating Stitch Count
To calculate the stitch count:
- Determine the design's complexity.
- Use embroidery software to get an accurate count.
- Adjust based on your machine's capabilities.
Importance of Stitch Count
Knowing the stitch count is essential for:
- Time Management: Helps in planning the project duration.
- Thread Usage: Determines the amount of thread required.
- Fabric and Stabilizer Choice: A higher stitch count might need more robust fabric and stabilizers.
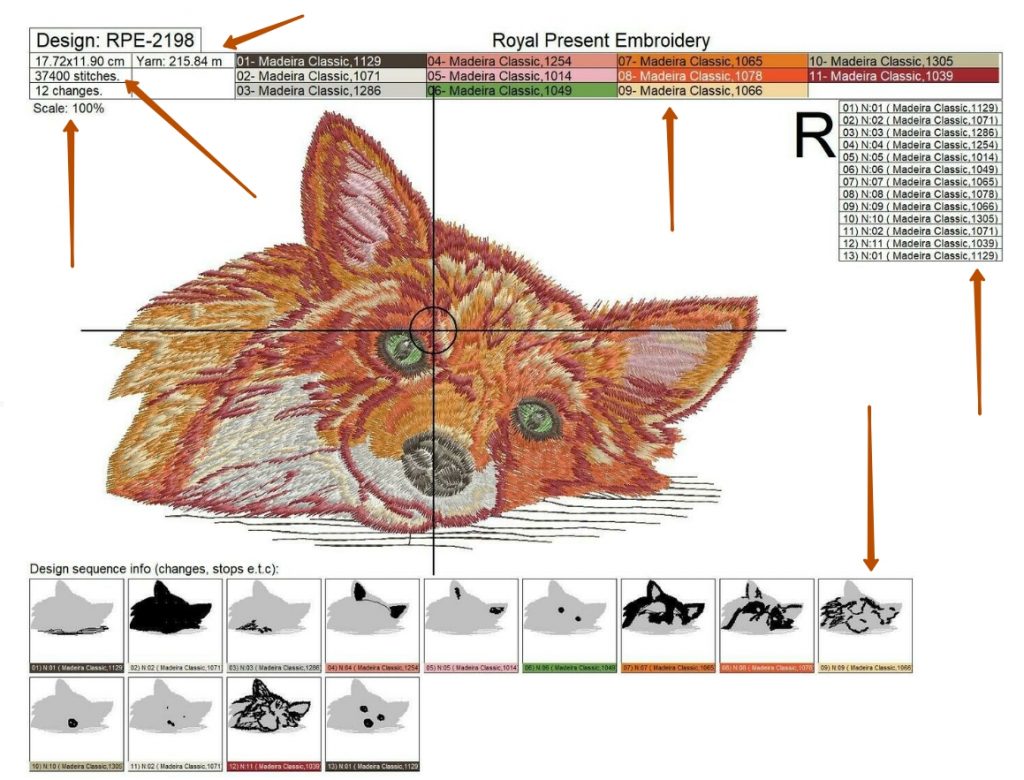
We present the color map displaying complete information on design size, and more.
Size Considerations in Machine Embroidery
Why Size Matters
The size of the embroidery design affects:
- Hoop Compatibility: Ensure the design fits within your machine's hoop.
- Fabric Suitability: Larger designs need bigger fabric pieces.
- Placement Accuracy: Consider the area on the garment or fabric where the design will be placed.
Determining the Right Size
To determine the right size for your design:
- Measure the intended area on the fabric.
- Check your machine’s hoop size.
- Use RESIZE OF DESIGN to resize the design if necessary.
Balancing Size and Density
Balancing the size and density is crucial. A large design with too high density can cause fabric distortion, while a small design with low density may look sparse.
Choosing the Right Fabric for Embroidery
Fabric Types and Their Impact
Different fabrics react differently to embroidery:
- Heavy Fabrics: Suitable for dense designs.
- Light Fabrics: Better for lighter, less dense designs.
Stabilizer Selection
Stabilizers are essential for supporting the fabric during embroidery:
- Cut-Away Stabilizers: Ideal for high-density designs on stretchy fabrics.
- Tear-Away Stabilizers: Suitable for light to medium density on stable fabrics.
- Water-Soluble Stabilizers: Best for delicate fabrics where the stabilizer needs to be completely removed.
Matching Fabric with Design Density
Choose the fabric based on the design's density:
- High-density designs require sturdy fabrics to prevent puckering.
- Low-density designs work well on lightweight fabrics.
Practical Tips for Managing Embroidery Density, Stitch Count, and Size
Pre-Planning Your Design
- Measure Twice: Ensure correct fabric size and design placement.
- Preview: Use software previews to check for density issues.
Testing and Adjustments
- Test Swatches: Run tests on fabric swatches.
- Adjust Accordingly: Make necessary adjustments to stitch count and density.
Monitoring During Embroidery
- Regular Checks: Pause and check the progress regularly.
- Thread Management: Monitor thread usage and replace as needed.
Post-Embroidery Finishing
- Remove Stabilizers Carefully: Follow the correct method for your stabilizer type.
- Pressing: Use a pressing cloth to avoid damaging the design.
You May Also Like
Embroidery Backings & Toppings Stabilizers

Author: Ludmila Konovalova
My name is Ludmila Konovalova, and I lead Royal Present Embroidery. Embroidery for me is more than a profession; it is a legacy of my Ukrainian and Bulgarian heritage, where every woman in my family was a virtuoso in cross-stitch and smooth stitching. This art, passed down through generations, is part of my soul and a symbol of national pride.
Date: 03.06.2016


 Get Sign-In Link
 Login with Google
 Login with Facebook
 Login with Amazon
 Login with Paypal