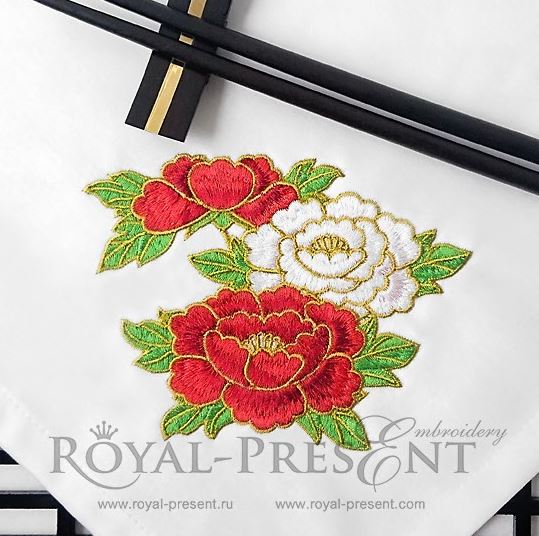
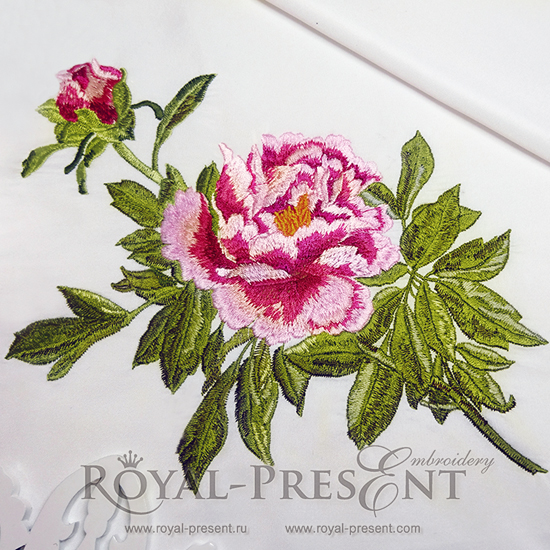
The whole world is obsessed with peonies. In wedding bouquets, accessories, home décor and even confectionary – voluminous pastel-pink beauties seem to have conquered people’s minds, hearts and souls with their ethereal grace. Fashion too couldn’t escape their aromatic flower-power. Alexander McQueen, Gucci, Dolce and Gabbana and so many others bowed to the floral majesties and made them star in their latest collection. On the verge of such wonderful craze, Royal Present Embroidery decides take a new approach to the magnificent flower. We take a step aside from the understated, blushing peonies which have been blooming on catwalks so far. We show another side of these ravishing blooms. We claim that peonies can be vivid, seductive and in such even more glamorous in our new Peonies Machine Embroidery Design.
Dramatic yet oh-so-tastefully feminine, these peonies should be on wardrobe of every woman. They can bloom on your basic bandeau or t-shirt dress and make it look instantly more stylish and chic. Gowns are not your usual choice? Why not spruce up your all-too-familiar pair of jeans to tune them up to the coming spring? Denim embellishments are all the rage this season, so jeans embroidered with peonies will be a huge hit for sure. Peonies Machine Embroidery Design boasts of a very aptly balanced composition. This and the fact that it comes in 3 sizes, makes it applicable for jeans of absolutely any cut. Straight-legged jeans, baggy jeans, cropped, skinny jeans or even deconstructed jeans – any cut, color and style are welcome to embrace the glamorous beauty of our peonies.
Peonies Machine Embroidery Design

Formats: .dst, .jef, .pec, .vip, .hus, .pes, .exp, .sew, .dat, .vp3, xxx
Haven’t yet ventured on an embellishment project of the kind? Don’t worry! With the quality of Peonies Machine Embroidery Design, you’ll have no problems no matter what type of denim your jeans are made of. So are you up for the revamping challenge? OK then, let’s the embroidery game begin!
First round: gathering the supplies
Get your jeans ready. If it’s a new pair, prewash it. Denim tends to shrink, so it’d be nice if you’d get this little thing settled before you begin.
What you’ll need besides the jeans:
~ Peonies Machine Embroidery Design and its template. If you plan on planting more than just one design on your jeans, than get as many templates as are in your plan.
~ Tear-away stabilizer.
~ Embroidery threads. You can go with rayon or poly, both will work great for the project. The design was tested on Madeira Classic 1074 Yellow Gold, 1049 Spruce, 1171 Natural White, 1114 Bisque, 1037 Tuxedo Red, 1181 Red Berry. If you prefer working with other brands or types of threads, you can change the mentioned ones for the ones of your choice.
~ Sharp, # 75/11.
~ Temporary spray adhesive. Gunold KK 100, 505, or any other good quality spray will do the job.
~ Chalk or a fabric pen. (When choosing a fabric pen, look for the type, which doesn’t need wash to disappear).
~ Sticky tape and scissors. (You’ll need sticky tape for temporary templates application).
~ Seam reaper and sewing threads. The sewing threads should match the ones that were used on the seams of your jeans.
Ok, now that you’ve gathered everything that you’ll need, let’s make you some swanky jeans!
Round two: looking for the perfect layout of the designs on your jeans.
During this round we’ll be helping you with planning the layout of the décor.
1 – Take several templates that you’ve printed out from the file of the design folder. We say “several” on purpose, for it’ll be easier for you to have them ready at hand if you want to get find the perfect layout.
2 – Cut them roughly around the outlines of the peonies image.
3 – Put on your jeans and apply the cut-out templates to areas that you think will show off the pattern best. You can always check with your reflection in the mirror. Use the sticky tape to adhere the templates onto the fabric.
4 – Take off your jeans.
Round three: the embroidery process.
This round has 5 stages:
1 – Designs centering.
2 – Deconstruction of the jeans.
3 – Hooping.
4 – Embroidering.
5 – Re-construction of the jeans.
Design centering
1.1 – With the templates still on, trace the axis points that are given on them onto the fabric. Use the fabric marker for the job.
1.2 – After the marks of vertical and horizontal axis are done, remove the template. Join the marks so that the axis would cross (like on the template). This will give you the center of the design.
1.3 – Mark the upper part of the future embroidery. This step is very important. I your layout requires some of the designs to be rotated in various directions, the upper mark will help you to hoop the “rotated” motives properly.
Deconstruction of the jeans.
Some areas on such garments as pants, trousers or jeans are not particularly agreeable with hooping. We’re talking about the legs, especially near the leg opening. But, no fear, any obstruction can be overcome with the help of a simple seam reaper. Yep, you guessed it; we’ll be opening seams so that you’ll be able to hoop the fabric easily. If your decorative layout involves back pockets too, then you might want to use a different technique of embroidery application. We’ll speak about this technique later, in our bonus round.Now, let’s discuss which seams could be opened for the hoop to fit in.
2.1 – If peonies embroidery designs are positioned on outer seams (hips, cuffs etc), then you’ll need to open the in seams on jeans legs. Otherwise, work the opposite side.
2.2 – Embroidering peonies on front pocket areas usually doesn’t need seams being opened.
Hooping.
3.1 – Spray temporary adhesive onto the stabilizer.
3.2 – Smooth the stabilizer on the back of the fabric.
3.3 – Hoop the fabric-stabilizer sandwich coordinating the marks their axis points.
Note:If there’s obstruction for the proper hooping (buttons, thick seams, zippers, etc.), use floating technique. It means that first you’ll need to hoop the stabilizer into the bands. Then, with the help of temporary spray adhesive, you’ll need to attach the garment onto the hooped stabilizer.
Embroidering.
4.1 – Embroidery as usual.
4.2 – After the embroidery is done, remove the excess stabilizer and all the loose thread ends.
Re-construction of the jeans.
5.1 – Change the threads for the sewing ones and sew the jeans’ seams back together.
Bonus round: “Planting” Peonies machine embroidery design on jeans without stitching it directly onto the fabric.
So your inner designer sees your jeans blooming with peonies all over, literally… This means that some “un-hoop-able” or “un-stitch-able” areas need also be covered with the embroidery. Back pockets, waist area, areas with rivets – all these little (or big) jean parts fall in the “un” categories, that we’ve mentioned above. So what will you do? The answer is “make peonies machine embroidery design into an organza – based appliqué and hand-stitch it onto the jeans”! It really is simple as it sounds. Organza is a great material for making such little “cheat” appliqués. The design of these peonies has nice amount of solid filled areas, which will hold and show perfectly well. So, don’t limit your inner designer to just “obvious” areas of work. With our tips you can easily go “pro” in embellishing jeans with embroidery.
First tip: Use water soluble stabilizer when making a machine embroidery appliqué with organza. Some embroiderers, however, manage to create perfectly crisp results using two layers of organza and temporary spray adhesive.
Second tip: Never pull to hard on organza when hooping it.
Third tip: When cutting out the embroidered design, don’t cut it to close to the stitching. You’ll have much neater result if you clean the edges with the help of some burning tool. A lighter or a soldering iron is what most crafter use. If you haven’t yet tried working with those, practice your hand on some organza scraps first. Be careful not to burn yourself though. Always remember, safety first. If burning tools is out of the question, than use our fourth tip.
Fourth tip: When you finish stitching Peonies Machine Embroidery Design onto your organza piece, apply some liquid seam sealant onto the outer stitches before you cut it out from the fabric. This measure will ensure a much longer life of the perfect embroidered flowers on your jeans!
Whether you opt for stitching it directly onto the garment or turning it into an organza appliqué, we’re sure you’ll enjoy working with peonies machine embroidery design. Stylish, eye-catching and wonderfully versatile, this pattern can be used on dresses, vests, accessories, bag and more. Create your own unique pieces or make much talked copy-cat fashions of famous designers – anything’s possible with ravishing flowers like these!
You may also like
Machine Embroidery Designs Peonies

Author: Ludmila Konovalova
My name is Ludmila Konovalova, and I lead Royal Present Embroidery. Embroidery for me is more than a profession; it is a legacy of my Ukrainian and Bulgarian heritage, where every woman in my family was a virtuoso in cross-stitch and smooth stitching. This art, passed down through generations, is part of my soul and a symbol of national pride.
Date: 11.05.2018

 Get Sign-In Link
 Login with Google
 Login with Facebook
 Login with Amazon
 Login with Paypal