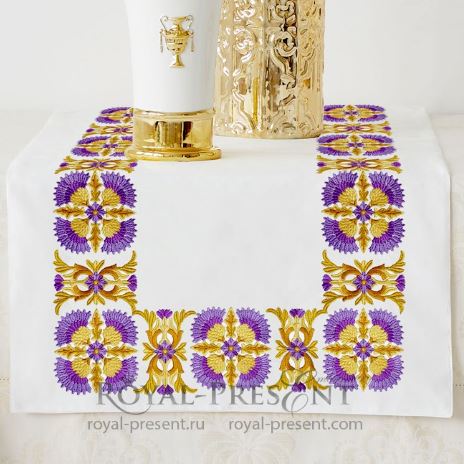
Do you want to move to an unforgettable Scotland? Do you want to get to know more closely their culture, symbols and handicrafts? Then you will just plunge into the process of embroidering these designs. Thistle is the royal symbol of Scotland, and its luxurious gold and purple colors are recognized in this country as the most skillful.
Embroidering Golden thistle border Two elements for machine embroidery, you will feel yourself the creator of incredible beauty, skilful and eye-catching objects. These two designs represent a truly rich, royal package.
Today we want to tell you how to embroider a napkin using an endless border created from machine embroidery design for border.
Imagine a snow-white table napkin with original machine embroidery design for border around the perimeter. It is so beautiful.
At first glance, it seems that to embroider such an endless border around the napkin perimeter is a difficult task and hard work. However, if you know a few secrets, the project becomes quite feasible.
Golden Thistle border two elements for Machine Embroidery
Size: 98.0×98.0 mm (3.86×3.86 “), Stitches: 25743
Size: 75.0×98.0 mm (2.95×3.86 “), Stitches: 9800
Formats: .dst, .jef, .pec, .vip, .hus, .pes, .sew, .exp, .dat, vp3, xxx
To join the Golden thistle border Two elements for machine embroidery properly, use a printed design template. You already know that you can find it in the information file, and you do not need to waste time creating it.
~ Print a few copies of the templates, and spread them around the perimeter of the napkin, alternating one pattern with another. Note: To make the border look endless, check that the sweeps of corners the pattern are in contact (as pictured in the description photo). Thus, you will create the impression that you really embroidered a wonderful border for one hooping.
~ Transfer the marks using the air-erase pen. Then go on to stabilization of the fabric.
~ We recommend using a tear-away stabilizer. Because the cloth-base for napkins is often a little transparent, the cut-away stabilizer can be illuminated.
~ Since the embroidery will be visible from both sides, use the lower thread in the tone of the top. With each color transition, reel the same shade on the bobbin.
~ After embroidery, remove the stabilizer and iron the fabric. Remember that products with embroidery should be ironed through another fabric, so as not to damage it. You can use a handkerchief or natural type of fabric.
Golden thistle border Two elements for machine embroidery will be the key to fulfilling your most cherished and long-awaited embroidered ideas.
Myths of machine embroidery – true or false? Let us understand.
Myth 1. All threads of machine embroidery are interchangeable, and you can easily use a thread of the same thickness of another manufacturer, if you ran out of thread during embroidery.
Answer: This opinion is quite erroneous. Even having the same thickness, the threads of different manufacturers give different results. First, one thread is still thicker, and the other is thinner. Secondly, they look on the cloth in different ways. So if you started embroidering a design, and you ran out of thread, buy the same, and only then continue the process. Otherwise, the transition from one producer’s thread to another will be very noticeable.
Myth 2. You can learn how to embroider by using recommendations in textbooks, articles, blogs and other sources.
Answer: Such information becomes useful only if you have applied it to practice. Remember, constant testing, practice combined with accumulated knowledge is the key to success. After all, machine embroidery is not a theoretical, but a practical science.
Successful embroidery!
You may also like

Author: Ludmila Konovalova
My name is Ludmila Konovalova, and I lead Royal Present Embroidery. Embroidery for me is more than a profession; it is a legacy of my Ukrainian and Bulgarian heritage, where every woman in my family was a virtuoso in cross-stitch and smooth stitching. This art, passed down through generations, is part of my soul and a symbol of national pride.
Date: 04.06.2018


 Get Sign-In Link
 Login with Google
 Login with Facebook
 Login with Amazon
 Login with Paypal