


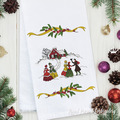
This digital set pairs a nostalgic winter scene with a long coordinating holly border. The scene depicts a red cottage in a snowy landscape with bare trees, a winding path and figures dressed for a winter walk; the border combines flowing gold ribbon with holly leaves and red berries. Use the scene as the focal point on a towel, cushion front, wall panel or table linen, and use the border as a finished-looking accent on a kitchen towel, table runner or rectangular cloth.
Both motifs are included in four original ready-to-stitch sizes. The download contains the winter scene and the matching border in every listed file format; fabric, stabilizer and thread are not included.
Set details
| Product type | Digital machine embroidery design set |
|---|---|
| Included motifs | Vintage winter scene and holly border |
| Sizes for each motif | 4 |
| Delivery | Digital download |
Sizes, stitch counts and compatible hoops
| Motif | Exact design size and stitch count | Minimum compatible hoop |
|---|---|---|
| Holly and ribbon border | Size: 45.8x178.1 mm (1.80x7.01 "), Stitches: 7519 | 100x180 mm (4x7") |
| Size: 50.9x198.0 mm (2.00x7.80 "), Stitches: 8395 | 100x200 mm (4x8") | |
| Size: 56.0x218.1mm (2.20x8.59"), Stitches: 9374 | 100x240 mm (4x9.5") | |
| Size: 61.2x238.1mm (2.41x9.37"), Stitches: 10419 | 100x260 mm (4x10") | |
| Vintage winter scene | Size: 103.9x158.7mm (4.09x6.25"), Stitches: 18897 | 130x180 mm (5x7") |
| Size: 114.2x174.6mm (4.50x6.87"), Stitches: 21149 | 130x180 mm (5x7") | |
| Size: 125.7x191.9 mm (4.95x7.56 "), Stitches: 23795 | 140x200 mm (5.5x8") | |
| Size: 129.8x198.2mm (5.11x7.80"), Stitches: 24730 | 140x200 mm (5.5x8") |
Formats: .dst, .jef, .pec, .vip, .hus, .pes, .exp, .sew, .dat, .vp3, .xxx
Coordinating vintage winter designs

|

|

|

|
Madeira Classic thread chart
Thread numbers and visible shades are transcribed from the supplied Madeira color map. Match thread by its Madeira number rather than by a screen display.
| Color | Madeira Classic 40 | What this color stitches |
|---|---|---|
|
|
1010 | Pale snow and landscape shading. |
|
|
1146 | Bright red cottage and clothing areas. |
|
|
1039 | Deep red clothing accents and shadowed details. |
|
|
1199 | Outlines, hats and darkest fine details. |
|
|
1371 | Evergreen foliage and green garments. |
|
|
1003 | Snow highlights and light details. |
|
|
1342 | Grey roof, path and landscape accents. |
|
|
1224 | Golden-yellow garments and small highlights. |
|
|
1236 | Faces, hands and warm small details. |
|
|
1006 | Dark green clothing and foliage details. |
Frequently asked questions and practical advice
How can I prevent outline shift around the cottage and walking figures?
The published guidance for this design is to choose stabilizer at roughly one-third of the fabric weight: for a 150 g/m² fabric, use about 50 g/m² stabilizer. Spray temporary adhesive onto the stabilizer, smooth the fabric over it without wrinkles, then hoop fabric and stabilizer together—flat and taut like a drum. Leave the stabilizer larger than the hoop so the layers cannot creep during the dense outlines.
What fabric works best for the scene and the long holly border?
Choose a smooth, stable woven base such as firmly woven cotton, cotton-linen or linen. For a towel project, embroider on a flat woven band or on a smooth towel rather than over deep terry loops, which can hide the narrow outlines and make the ribbon edge uneven. Test the selected motif on the same fabric and stabilizer before stitching the finished item.
How should I place the separate border and scene on one runner or towel?
Decide first which finished edge is the reference edge, then mark the centreline and the scene position from that edge. Print both chosen files at 100% to check spacing and keep the border clear of hems, folds and bindings. Stitch each file in its own hooping, using the machine trace before every run; tracing is especially important for the long border because it is narrow and close to the hoop boundary.
Why is a full test stitch useful for this vintage winter set?
The scene combines long outlines, filled garments and small features, so fabric pull-in can be visible where a roof, path or figure changes direction. A test stitch reveals whether the fabric and stabilizer remain stable with the chosen hoop and whether the machine’s trace position avoids seams. Correct the hooping or support before starting the final towel, runner or cloth—not after the outlines have shifted.

 Get Sign-In Link
 Login with Google
 Login with Facebook
 Login with Amazon
 Login with Paypal